This article will show you how to register an Azure Function as an application in Azure Active Directory so you can call other web services under the application’s identity. This allows you to securely authenticate the Azure Function, and to elevate permissions (i.e. the Azure Function can do things that its caller doesn’t have permission to do.) You can think of this as the cloud equivalent of a service account: it’s an identity that represents an application instead of a person.
This series will show you how to call SharePoint’s Client-Side Object
Model (CSOM) from an Azure Function. It’s divided into three sections,
in hopes that the first two sections are reusable in other scenarios. I’ll probably add more scenarios in the future, but will keep the URL’s the same.
Part 1 – Setting up your Azure Function
Part 2 – Registering your Azure Function with Azure Active Directory (this posting)
Part 3 – Calling CSOM with Application credentials from your Azure Function
Registering an Azure AD Application for your Azure Function
Creating a Certificate
The first step in registering an application is to generate a certificate that will allow the application to prove its identity using private key cryptography. The certificate will have two keys: a public key and a private key. Everybody knows the public key; in fact they can look it up in Azure Active Directory. Only the application has the private key, and it can prove its identity by decrypting a message that was encrypted using the public key.
PowerShell includes the ability to generate such a certificate (the older makecert utility has been deprecated.) Simply use this command:
New-SelfSignedCertificate -KeyExportPolicy Exportable `
 -Provider "Microsoft Strong Cryptographic Provider" `
 -Subject "CN=<application name>" `
 -NotBefore (Get-Date) `
 -NotAfter (Get-Date).AddYears(2) `
 -CertStoreLocation "cert:\CurrentUser\My" `
 -KeyLength 2048
You can use any X.509 distinguished name as the as the subject; here I just use a short one containing a common name (CN) for the application. The certificate will be self-signed and will be valid for two years from the current date. (Don’t close PowerShell! You’ll need it again in a few minutes.)
This command will put the certificate in the Windows certificate store for the current user. To get to it on a Windows machine, you need to use the Certificates MMC snap-in. Use start/run and type “mmc” to start the MMC, then add a snap-in for Certificates. Select “My user account” as the certificate store to manage.

You should find your certificate under Personal/Certificates.

You’ll need to export the certificate twice: once in a format that allows us to get the public key, and once in format that includes the private key. Let’s start with the private key export; right click the certificate, select All Tasks, then Export. Export it as a .pfx file including the private key.
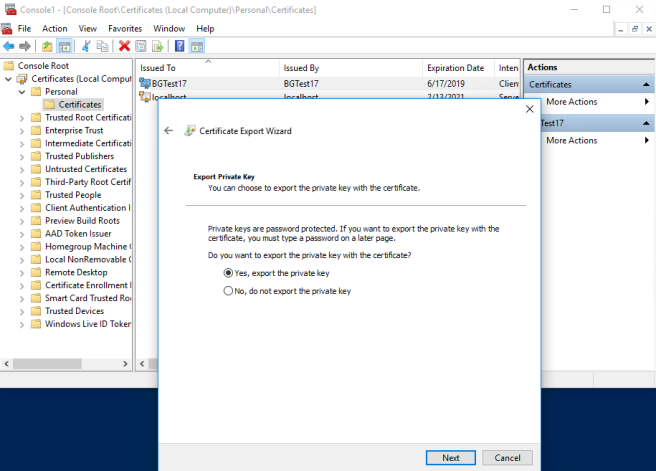
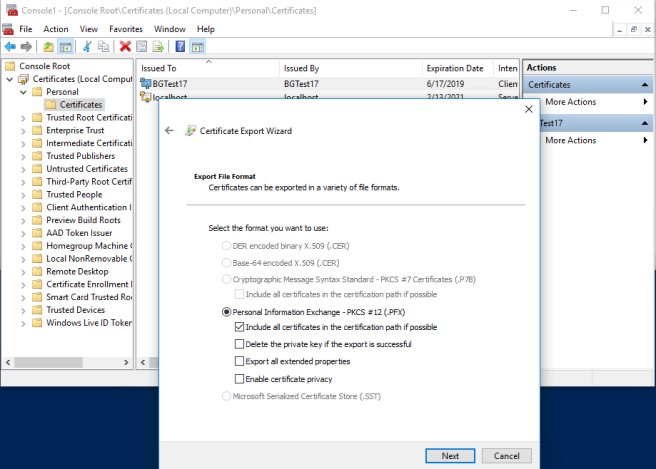
When prompted, enter a password to secure the private key.

Save the pfx and password for use in the application.
Now export the certificate again, this time with no private key as a .cer file using the DER encoded binary format.

Now, back in PowerShell, run these commands to extract the public key and other information needed to register your application.
$cert = New-Object
System.Security.Cryptography.X509Certificates.X509Certificate2
"(full path to the exported .cer file)"
"customKeyIdentifier: $([System.Convert]::ToBase64String($cert.GetCertHash()))"
"endDate: $($cert.NotAfter.ToString(""s""))Z"
"keyId: $([System.Guid]::NewGuid().ToString())"
"startDate: $($cert.NotBefore.ToString(""s""))Z"
"value: $([System.Convert]::ToBase64String($cert.GetRawCertData()))"
This will display values needed in Azure AD; keep them handy for a future step.
Register the Application
The next step is to register the application in Azure AD. For this exercise, you’ll use the Azure portal. Navigate to Azure Active Directory and click “App registrations”. Then, at the top of the righ panel, click “+ New application registration”.
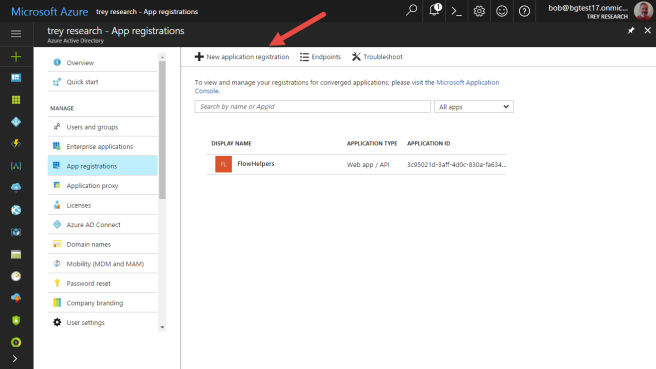
Enter the name of the new application, and since we’re going to use it on an Azure function that’s triggered by a web request, choose Web app/API as the application type. For the sign-on URL, use the URL of your Azure function.

Click on your new app registration to open it; it should look something like this:

Now it’s time to plug in the application’s public key and other information from the certificate. This information belongs in the app’s Manifest, which is a JSON file; you can click the pencil to open an editor.
WARNING: The manifest editor is evil! I have never been able to enter the certificate value (public key) using the editor without getting mysterious errors, and even when the value is set up properly, it shows “null.” Don’t trust the editor at all! Instead, download the manifest, edit it in the text editor of your choice, and upload it. If you have trouble uploading your changes in the new Azure portal, go back to the old one.
You need to fill in a JSON element called “keyCredentials”, which will be an empty array [] when you start. Here’s how to fill it in:
"keyCredentials": [
{
"customKeyIdentifier": "(paste from PowerShell)",
"endDate": "(paste from PowerShell)",
"keyId": "(paste from PowerShell)",
"type": "AsymmetricX509Cert",
"usage": "Verify",
"value": "(paste from PowerShell, removing any line breaks)"
}
],
Here’s a working example from my Azure AD:
"keyCredentials": [
{
"customKeyIdentifier": "GwJy4AlCqgAE5TlRPq7oz1HHLmk=",
"endDate": "2019-06-17T18:07:24Z",
"keyId": "1d9187d7-c410-4338-83d4-3c7127430533",
"type": "AsymmetricX509Cert",
"usage": "Verify",
"value": "MIIDADCC (shortened for brevity) rof29A6IQ=="
}
],
With these values, the manifest editor shows a null value.

Now the application is registered in Azure AD, which means that anyone with access to the directory can get the application’s public key and use it to authenticate the application. However that’s not too helpful unless the application has permission to do something useful. Granting permissions is next.
Grant Permission to the Application
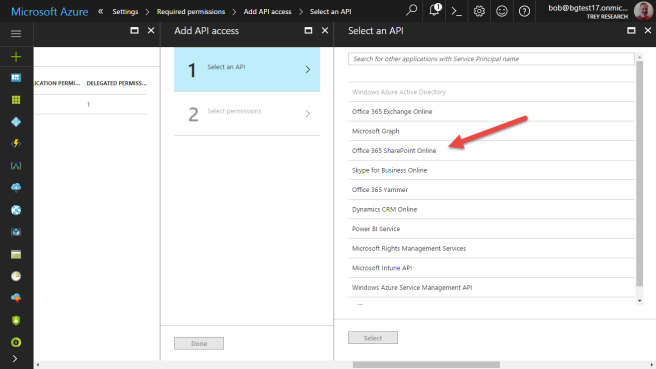
In the Azure portal, navigate to your app registration and click Required Permissions.

In this case, we want to grant the application access to SharePoint Online API, so click “Select an API”.

Now select Office 365 SharePoint Online.
Select the application permission(s) that grant your application as much access as it needs, and no more. Unfortunately, the permissions aren’t very granular; in order to read one document, we need give permission to read items in all site collections.

Click Done – but that’s not enough! Since we chose a permission that requires administrative consent, we need to consent to the permission we just assigned. Since you’re an administrator, you can do this yourself; just click the Grant Permissions button.
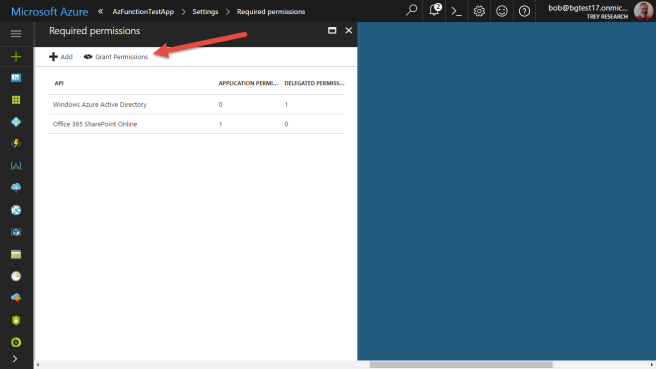
View the consent form and click Yes to put the new permissions into effect.
Continue to the next session to learn how to make CSOM calls using the Azure AD application you just registered.
Part 1 – Setting up your Azure Function
Part 2 – Registering your Azure Function with Azure Active Directory (this posting)
Part 3 – Calling CSOM with Application credentials from your Azure Function (next posting)
0.01

Hi. you don’t have anything in the powershell command to get the ‘Value’ of the certificate, it this line here that I’m trying to find the value for:
“value”: “(paste from PowerShell, removing any line breaks)”
LikeLike
Good catch – thanks David, I omitted a critical line of code! I just updated the article – see line 8 in the 2nd PowerShell listing for the code to extract the certificate value.
LikeLike
Hi Bob. missing some curly braces (2 of them) at the end of project.json
LikeLike
Would you mind putting up the completed files, or emailing them to me. After going through everything in the tutorial and trying to do the final run…. I get an oh so helpful error of ‘script compilation failed’ but no mention of what script even it was that is the problem.
thanks
LikeLike
Fixed – thanks!
LikeLike
I have posted all the code here: https://gist.github.com/BobGerman/2f6bcbd3ca6bd75fd1ae175d53dba8cc
Hope this is helpful!
(David I didn’t approve some of your more detailed questions in the comments, hoping this solves it for you. Also note the file path to the certificate has the Azure function name in it; you need to change it to your Azure function name. Thanks for your input and interest!!)
LikeLike
When uploading the app manifest (or editing it in the manifest editor) it didn’t like the endDate, or startDate, or both in the “keycredentials” JSON element. I got an error: KeyDate… something or other, and it rejected the upload / edit to the app manifest.
Solution was to provide no date fields. It then worked – and filled in the dates for me into the “keycredentials” JSON element (which were exactly as I did manually per the output of the PS command that extracted them from the cert files but didn’t work).
Might help someone with the same issue. And any explanation might be illuminating.
LikeLike
You no longer need to extra information from the .cer file using PowerShell, that entire step can be skipped. In the new Azure Portal you can now upload the .cer file itself and Azure will do whatever it needs to do for you.
LikeLike