This is part of a blog series explaining a new open source solution (located here) for provisioning Microsoft Teams. The solution is based on Azure Functions which communicate with Microsoft Flow (or really anything) using Azure queues. This allows a Flow, PowerApps, or Logic Apps developer to use whatever logic they wish and, when a Team is to be created, queue a message to an Azure Function which will do the work.
This is Part 2 of the series:
- Solution Overview
- Installing the solution (this post)
- Building a Flow for the solution
- Looking at the code
- A Change in Direction
Check your Azure Subscription
Before you start installing things, ensure that you have an Azure subscription where you can run the Azure Functions, Azure storage queues, and Azure Key Vaults. (NOTE: None of these are high ticket items… this is not going to break the bank!)
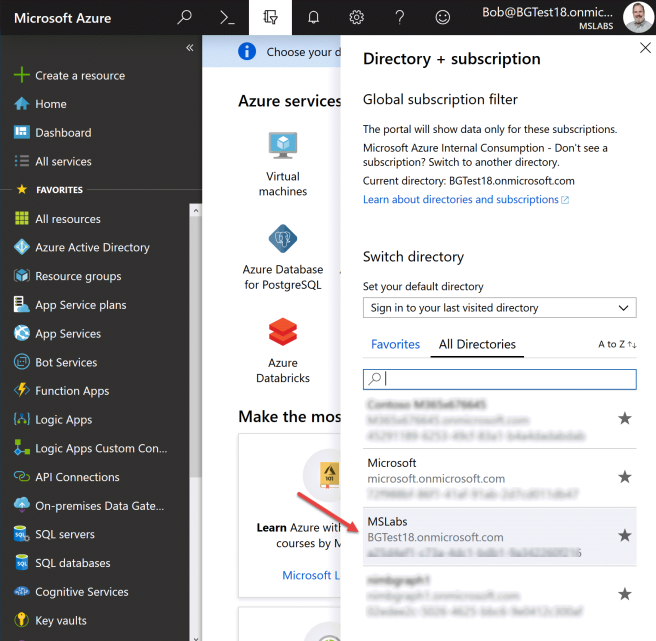
The tricky part is ensuring your Azure subscription is associated with the same Azure Active Directory domain as your Office 365 subscription. Click the Global Description Filter at the top of the Azure Portal screen and ensure the directory associated with the subscription you’re working with has the same domain name (.onmicrosoft.com) as your Office 365 subscription, or none of this will work.
It is possible to switch an Azure subscription to associate with a different Azure AD directory – don’t do this if the subscription is in use because things will break! But maybe you have a new Azure subscription and need to associate it with the same Azure AD domain as your Office 365 subscription (same .onmicrosoft.com domain). To do that, go to Subscriptions in the Azure Portal and click on the subscription you want to use and use the Change Directory button. If the Change Directory button is grayed out, your login account is probably not an admin in more than one Azure AD; the easiest way to do this is to use a Microsoft account (live.com, outlook.com, hotmail.com etc.) and grant it admin rights to both the old and new directories; then when you log in with the Microsoft account you’ll be able to make the switch.
Once your Azure and O365 subscriptions are connected to the same Azure AD, you’re ready to begin installing the solution.
Step by Step Instructions
The good news is that this project comes with an Azure Resource Manager template, which creates and configures the Function App. This allows easy creation of development, staging, and production environments (or whatever environments you wish), and configures them for continuous deployment from Git. It also reduces the number of setup steps, but there are still several.
1. Set up your github repo
At the end of the setup, you’ll have one or more Azure Function Apps set up for continuous deployment from a github repository … but what github repository? While you could certainly deploy directly from the main repo, it’s probably not a good idea. Instead, fork the repo or copy it into a new github repo of your choosing. For simplicity, keep the file structure the same with the Function App at the root of the repository (i.e. don’t copy this repo to a subfolder in another repo unless you’re prepared to tweak the installation scripts).
Save this information for future steps:
- The URL of the public github repo (or a private one that you’ve set up a deploy key for
- The name of the branch you want to deploy from
2. Create your Templates library
Determine what SharePoint site and library you want to use to store your JSON template files. This doesn’t have to be fancy, but the code expects the JSON template files to be at the root of the library. Copy in the sample JSON template files from the Documentation/Samples directory into the library. Notice that the file names end in .json.txt; this is because SharePoint doesn’t allow .json files.
Save this information for future steps:
- The SharePoint site URL
- The SharePoint library name
3. Register the Application
In order to call Microsoft Graph with an application identity, we need to register an application in Azure AD. Begin in the Azure portal under Azure Active Directory; click “App Registrations” (not “App Registrations(Preview)”, which is for Azure AD v2.)
Click the + at the top of the page to add a new application. Give your application a name, and keep the default Application Type at Web/API. The Sign-on URL isn’t really used but since you’re forced to provide one, choose https://localhost/.
Now click “Settings” and then “Grant Permissions”. Click + and then select Microsoft Graph as the API. Notice that there are a large number of permissions; application permissions are near the top, followed by delegated permissions. In this case we need application permissions so make sure you’re not assinging delegated ones! Specifically, you need to check off:
- Read and write all groups (Group.ReadWrite.All)
- Read all users’ full profiles (User.Read.All)
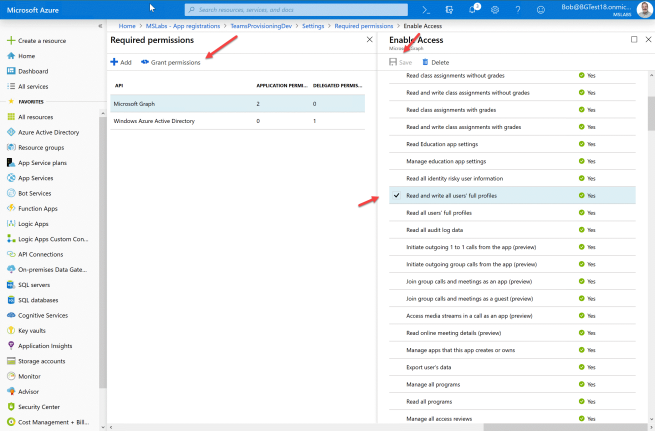
Don’t forget to Save and then use the “Grant Permissions” button to consent to the new permissions.
Now you need an application key (or “secret”); back under settings click “Keys”. Add a new key description and select its lifetime. (Keep it to 1-2 years in Production and make a note to update the key before it expires!)

Save this information for future steps:
- Application ID (from the application blade in the Azure Portal)
- Application key (from the previous step)
NOTE: You may want separate applications for dev, staging, and production, etc. – if so, just repeat this step and save the values for each environment.
4. Set up Key Vault
The application key is supposed to really be secret! So store it safely away from prying eyes in Azure Key Vault.
In the Azure portal under Key Vaults, click + to add a new key vault. Give it a name, location, and resource group. For best results, choose the same location that you plan to host the Azure functions in! However you probably shouldn’t use the same resource group; you may want to delete the resource group(s) containing your Azure Function app and still reuse the app registration and its secret key stored in Key Vault.
In your new Key Vault, click Secrets and + to add a new one. Give the secret a name and paste in the Application Key from the previous step.
Within your new Secret, copy the current version’s Secret Identifier.

Save this information for future steps:
- The KeyVault secret identifier
You won’t need the application key again unless you’re using the debugger (details below), so feel free to delete all copies other than the one in Key Vault if you’re not going to be debugging. Note that anybody with this key can easily read and write all Groups and read all full User profiles; do you really want to give that much permission to your developers? If not, they should be in a different tenant! There’s no way to give them application permissions to only certain groups within the same tenant, so be aware of that. For a typical setup, I suggest having a separate developer tenant with two sets of functions (dev and test) and then in your production tenant, set up two sets (staging and production).
5. Create parameters file
Download or clone the github repository from step 1. In the TeamsProvisioningRG folder, edit dev.parameters.json or prod.parameters.json, or make a copy of sample.parameters.json and name it for your target environment.
NOTE: Eventually you’ll have a parameters file for each target environment.
Fill in the following values in the parameters file:
- appName: The name of your application, to be used in naming the Azure Resource Group and other Azure resources
- repoUrl: The URL of the github repo containing your Azure functions
- branch: The name of the github branch you want to deploy from
- TENANT: Your Azure tenant ID, which is called the “Directory ID” under Properties in the Azure AD blade in the Azure portal
- CLIENT_ID: The Application ID you registered in the Step 2
- CLIENT_SECRET: The string “@Microsoft.KeyVault()”, adding the key vault secret ID from Step 3 between the parenthesis
- TEMPLATE_SITE_URL: The server-relative URL of the SharePoint site containing your JSON templates such as /sites/myProvisioningSite
- TEMPLATE_LIB_NAME: The name of the SharePoint library holding the JSON templates
Notice that the parameters file gives you the ability to use different app identities, Key Vaults, and SharePoint libraries in each environment if you so choose.
6. Create installation script
Edit and adapt one of the provided installation scripts (InstallDev.ps1 or InstallProd.ps1) with your desired resource group name, resource group location, and parameter file name.
7. Install the Resource Group with Function App
Ensure Azure PowerShell is installed. Run Connect-AzureRmService to connect to Azure, and then the Install command you just edited. The script should create:
- A resource group for your solution
- An Azure Function App set up with github deployment (it should build itself initially, thus creating the CreateTeam and CloneTeam functions)
- A storage account used by the Azure Function app, which will contain the Azure queues
- Four Azure queues – a request and completion queue each for creating and cloning Teams
8. Grant the application permission
At this point, your application will fail to authenticate because it can’t read the app secret out of KeyVault. Go back to the KeyVault you created in step 4 and click “Access Policies”. You should see an access policy for yourself. Add another for the Function App by enabling the List and Get secrets checkboxes and clicking Select Principal and finidng the application.

9. Obtain the storage account name and key for use in Flow
In the Azure Portal under Storage Accounts, find the storage account for your environment (the Resource Group name is an easy way to find it). Open it up by clicking on the Storage Account name then Access Keys, and save the Storage account name and one of the keys for use by Flow or PowerApps.

Save this information for future steps:
- Storage account name
- Storage account shared key
Test your solution
You can test your solution without Flow, and it’s a good idea to do so before proceeding!
Still in your storage account, click Overview and then Queues to view your storage queues. You should see four of them.
To test the Clone operation, add a message to the clone-team-request-queue, substituting your Team names:
{"oldTeam":"oldTeamName","newTeam":"newTeamName"}
This will clone the old team and name it the new team. Note there are a number of caveats here including there’s no way to assign new owners to the cloned Team at the time of this writing. Instead, it will have no owner for a couple hours, and then one of the original team’s owners will be given ownership.
To test the Create operation, adjust this message for your environment and add it to the create-team-request-queue:
{
  "requestId": "123",
  "displayName": "New team name",
  "description": "New team description",
  "owner": "someone@myTenant.onmicrosoft.com",
  "jsonTemplate": "EngineeringTemplate"
}
After a few minutes, a completion message should appear in the create-team-completion-queue.
{
    "success": true,
    "requestId": "123",
    "teamId": "56dc0bb8-1134-4691-9b49-c19fea5af0fd",
    "teamUrl": "(link to the new team)",
    "teamName": "(name you requested)", "teamDescription": "(description you requested)",
    "owner": "someone@myTenant.onmicrosoft.com",
    "error": "" }
If there was an error, you’ll get the same structure except success will be false and the error will be filled in with a (hopefully) meaningful error message.
Updating the Code
To change the code, check it into the github branch you specified. Then navigate to the function app in the Azure Portal and on the Overview tab under Configured Features, select Deployment options configured with ExternalGit.
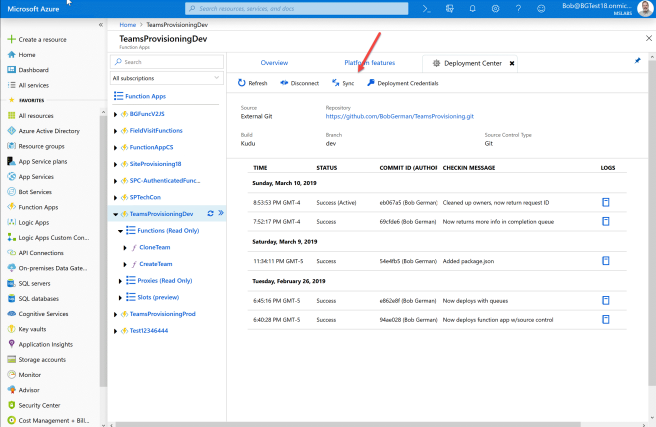
Click the Sync button near the top to bring down the latest contents of the repo. (Azure also supports fully automated deployment, however the resource manager template in this project uses the manual option so you need to ckick Sync.)
Debugging the code
NOTE: When debugging, you can use the Azure Queues from one of your real deployments – just be sure to disable the Azure Functions or you will race to read the queues before the live Azure Function does!

To debug with Visual Studio Code, install (in addition to VS Code itself) the latest version of the Azure Function Core Tools.
Copy the local.settings.sample.json file to just local.settings.json (this file will not be checked into source control). In local.settings.json, enter all the values you used above with the exception of the CLIENT_SECRET – enter the secret itself, not the KeyVault location. (Again – this is a good reason to develop in a separate tenant so the client secret for your production tenant isn’t laying around! Anyone with that secret can read all O365 Groups including their SharePoint sites, Teams contents etc. – so treat it with care!)
Now, with the Azure Function folder open, click the debugger icon on the left of Visual Studio Code and then click the green arrow to build and run your project.
At this point, you can add messages to the queues as explained above, except your function will run locally and you can set breakpoints.
What’s next?
Stay tuned for the next installment of this series, Building a Flow for the Solution!

Is there a reason that you use the V1 app registration UI instead of the (currently in preview) V2 app registration UI? Still reading series and haven’t gone through the code to see if something is specific to V1, so forgive my ignorance.
LikeLike
Both MSAL and registration portal are in Preview – I wanted a solution that wouldn’t break compatibility when MSAL is finally GA. This is ultimately targeted at partners and customers with limited coding skills so I chose stability over currency.
Let’s discuss offline Brian; there are more changes afoot and I’d like to get your opinion…
Thanks!
LikeLike
Hi Bob,
First, I’d like to give you a huge thanks for taking the time to write this well-written post.
now to my question, I’ve come to the “Test your solution” section in your guide, where Cloning a team works fine, but I cannot get the Create team to work. I’ve gone to the “create-team-request-queue” pressed “Add Message”
Written the following.
Note* owner is the actual UPN
{
“requestId”: “321”,
“displayName”: “TeamProvisioning-Test”,
“description”: “TeamProvisioning-Test description”,
“owner”: “UserPrincipalName”,
“jsonTemplate”: “ProjectTemplate”
}
Response:
{
“success”: false,
“requestId”: “321”,
“teamId”: “”,
“teamUrl”: “”,
“teamName”: “TeamProvisioning-Test”,
“teamDescription”: “TeamProvisioning-Test description”,
“owner”: “UserPrincipalName”,
“error”: “UnauthorizedAccess – Failed to execute Templates backend request CreateTeamFromTemplateRequest. Request Url: https://teams.microsoft.com/fabric/templates/api/team, Request Method: POST, Response Status Code: Unauthorized, Response Headers: Strict-Transport-Security: max-age=2592000\r\nX-MSEdge-Ref: Ref A: BA5B04F5015C41518AFDE9690E4022B7 Ref B: DB3EDGE0814 Ref C: 2019-06-12T15:14:35Z\r\nDate: Wed, 12 Jun 2019 15:14:35 GMT\r\n, ErrorMessage : {\”errors\”:[{\”message\”:\”AccessToken token is not valid.\”}],\”operationId\”:\”fc28fad95742a349811f80900bfc634e\”}”
}
I’ve tried to figure it out, but without success, hence this message. Made a search on the web as well and found 1 guy had the same problem with his application, which happened 30th of May without any change from him. Do you think Microsoft could have made any changes? or any other ideas to solve this?
Also, I had to specify the API permissions “Files.Read.All” for the App registrations in order to be able to download the file from the Sharepoint Library. Maybe there is any other permission I’m missing other than:
Group.ReadWrite.All
User.Read.All
Files.Read.All
Thanks in advance.
Regards
Sebastian
LikeLike
Sorry I’ve been slow to respond on here as I’ve been working on other stuff …
I need to get my own version working again and then start moving forward to Tenant Templates! It’s possible something changed, yes … but I haven’t tested in a while so I can’t say for sure.
Sounds like I need to add Files.Read.All – makes sense, thanks!
LikeLike
Thanks Bob this is a really great series. I’m a little stuck and wondering if you could help. I;ve not worked with function apps before and struggling to debug an issue from VSCode. I get:
LanguageWorkerConsoleLog[error] Worker was unable to load function CloneTeam: ‘Error: Cannot find module ‘adal-node”
worker-bundle.js:7070
LanguageWorkerConsoleLog[error] Worker was unable to load function CreateTeam: ‘Error: Cannot find module ‘adal-node”
Pretty sure I have everything installed correctly.
LikeLike
I’m going to guess you need to run “npm install” to bring in the packages such as adal-node?
LikeLike
Hi Bob,
Really great article – I got it up and running as a test. The clone function works great –
However the create function give me an error after two minutes:
2020-06-18T12:44:42.739 [Information] Completion retry count exceeded
2020-06-18T12:44:42.739 [Information] ERROR: Completion retry count exceeded
The strange thing is that the team is actually created and looks fine on the surface. It’s using your example with the engineering json/template – and I’m wondering if anything from it might not have been added before it hit the retry max count. Any way I can add a higher retry count or is something amiss?
Also a small note regarding the installation script – it creates an “Application Insights” which ignores the azure location specified – so I’ve ended up with storage, App service and service plan in West EU and App insights in East US.
Thank you very much!
LikeLike
Sounds like the service is running slow and you need a larger retry count. And yes – the Team may seem OK but if it’s not complete then some detail is probably not done yet and features may not work until the service says it’s done.
In the code — for cloning – see Services/Teams/cloneTeam.js (for creating it’s createTeam.js)
The retry count and interval are on lines 4 and 5:
const NUMBER_OF_RETRIES = 20;
const RETRY_TIME_MSEC = 5 * 1000; // 5 sec
You can increase the number of retries, or perhaps check less frequently if you’re finding that it takes longer than it did when I built it (I never exceeded the 20*5sec=100sec.
Thanks!
LikeLike
Thank you for the very quick reply! That worked.
Also – for anyone else wondering – the App Insights location is set in the “azuredeploy.json” file (line 209).
LikeLike