This is part of a blog series explaining a new open source solution (located here) for provisioning Microsoft Teams. The solution is based on Azure Functions which communicate with Microsoft Flow (or really anything) using Azure queues. This allows a Flow, PowerApps, or Logic Apps developer to use whatever logic they wish and, when a Team is to be created, queue a message to an Azure Function which will do the work.
This is Part 3 of the series:
- Solution Overview
- Installing the solution
- Building a Flow for the solution (this post)
- Looking at the code
- A Change in Direction
Going with the Flow
Now that you’ve got your Azure Functions ready, the fun begins: creating a Flow (or Logic App, PowerApp, etc.) to provision Teams. Actually you’ll need two Flows: one for handling requests (a PowerApp could do this directly), and one for handling completions.
This article won’t explain how to design your Flow; the idea is to tailor it to each organization that wants to use it. But I will show you how to interact with the Azure Functions – without using a “Premium” connector! (That’s not why I chose queues however – I chose them because they offer guaranteed delivery and are a best practice in front of a long-running operation.)
To test the solution I created a simple request Flow based on a SharePoint list; users request a Team by adding a row to the list, and there is an approval step. The request flow places the list item ID in the requestId field to the Azure Function; this allows the completion flow to update the request list item after the function runs. I wanted to build something realistic enough to prove that the solution works end to end, but not spend too much time since I’ve found each customer wants something different … So I’ll just show you how to connect a Flow to the solution and let you design the details.
Connecting to the Azure Queues and Storage Account
First, in Flow, click the gear icon at the top of the screen and select Connections. Click + to add a new connection. Search for Azure queues and add one. Paste in the Storage Account Name and Shared Storage Key you saved from the Azure storage account.

Creating a Request Flow
Create any request flow you wish, just make sure you capture the information you need:
- Team name
- Team description
- Owner (email or GUID – note that only a GUID works in the Graph API right now, but the Azure Function will try to translate anything with an “@” in it from a user email to a user ID/GUID)
- JSON template name
- Request ID (any value that will help the completion Flow to do its job)
When your logic is done and you’ve decided to go ahead and provision a Team, use the “Put a message on a queue” action to send the information.
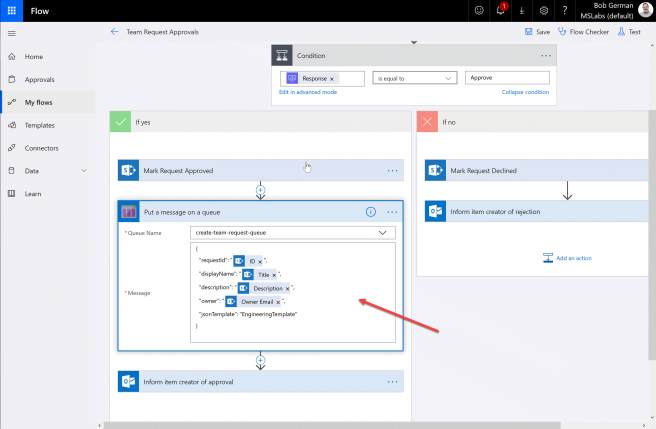
Notice that the queue message is a JSON structure:
{
  "requestId": 9999,
  "displayName": "New test team",
  "description": "Testing something new",
  "owner": "user@myTenant.onmicrosoft.com",
  "jsonTemplate": "EngineeringTemplate"
}
Creating a completion flow
You need this Flow if only to empty the completion queue – unless you modify the Azure Function to stop using it! However it’s a great opportunity to send the requester an email with the results – hopefully a link to their shiny new Team.
Create the Flow with a “When there are messages in a queue” trigger. Then add a “Parse JSON” action and pass in the Message Text from the trigger. Generate the schema from a sample message – this is what you can expect:
{
    "success": true,
    "requestId": "9999",
    "teamId": "00000000-0000-0000-0000-000000000000",
    "teamUrl": "https://teams.microsoft.com/l/team/longgnarlyurl",
    "teamName": "New test team",
    "teamDescription": "Testing something new",
    "owner": "user@myTenant.onmicrosoft.com",
    "error": "" }
This should give you all the information you need to inform the user of success or inform an IT admin about any errors.
NOTE: At the end of your flow, use the Delete Message action on the Azure Queue to delete the message you just processed; otherwise the queue will keep growing and your Flow may run again and again processing the same completion!
What’s next?
Stay tuned for the next installment of this series, Looking at the Code!

Hi Bob,
Great post and a very nice solution. I’ve got one issue with getting the downloadURL from JSON.parse(respone.body) in getDownloadUrl. It seems like parsing the response is failing and not returning the complete body of the GET request. Using Graph explorer is working with the same url for getting the file an the dowloadURL received in Graph Explorer is fine. CloneTeam function is working fine. Any idea?
LikeLike
Hi,
I had to add the permission “Files.Read.All” to the app-registration in order to actually get the template, everything else was working for me as well. but adding this permission gave me another error. But hope this helps you. I’ve posted my question in the second part of this guide.
LikeLike