In old-school SharePoint, if you wanted to run some custom code in a web part, workflow, form, or event handler, you wrote either a sandboxed or a farm solution. Neither of these are supported in SharePoint Online. So what are developers supposed to do when they need to run some code somewhere other than the web browser? How can they run code in the background, elevate permissions, or fill gaps in the “out of the box” configuration options?
The modern answer is Azure Functions. It’s a much better sandbox than SharePoint used to have, yet, like a sandboxed solution, you don’t have to worry about where to put it. Just choose what will trigger your function, such as a web service request, web hook, Service Bus message, or a time schedule. Then pop in your code and you’re good to go. They call it “serverless” computing, but there are servers somewhere! You just don’t need to worry about it.
This series will show you how to call SharePoint’s Client-Side Object
Model (CSOM) from an Azure Function. It’s divided into three sections,
in hopes that the first two sections are reusable in other scenarios. I’ll probably add more scenarios in the future, but will keep the URL’s the same.
Part 1 – Setting up your Azure Function (this posting)
Part 2 – Registering your Azure Function with Azure Active Directory
Part 3 – Calling CSOM with Application credentials from your Azure Function
For a good introduction to Azure Functions, check out the seminal blog article on the Azure blog. To set up an account (needed to complete the steps in this article), see the Azure Functions main page on the Azure Portal.
You may also want to call your Azure function from Microsoft Flow; Julie Turner has just published a great blog article which includes filling gaps in Flow’s SharePoint connector and using the Azure function to write fields such as Person, Choice, or Managed Metadata which oddly are missing at the time of this writing.
Simple Setup for an Azure Function
The instructions in this section will get you started with an Azure Function you can play with in various scenarios; it doesn’t include all the aspects you’d consider in a production environment such as testing, source control, and devops.
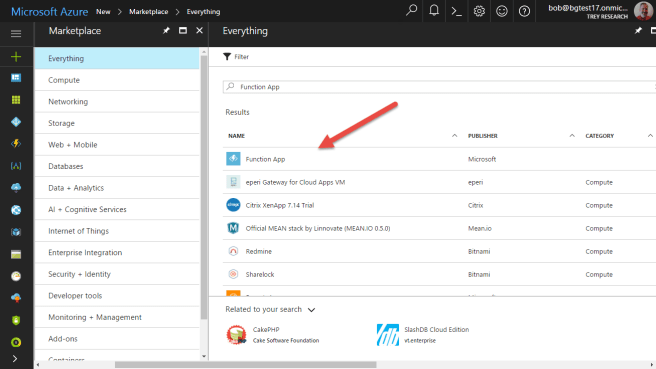
The first step is to create a Function App, which is a collection of Azure functions. Begin in the Azure portal. Click the green “+” sign on the left panel to add something, then select Function App (you may need to search for it).
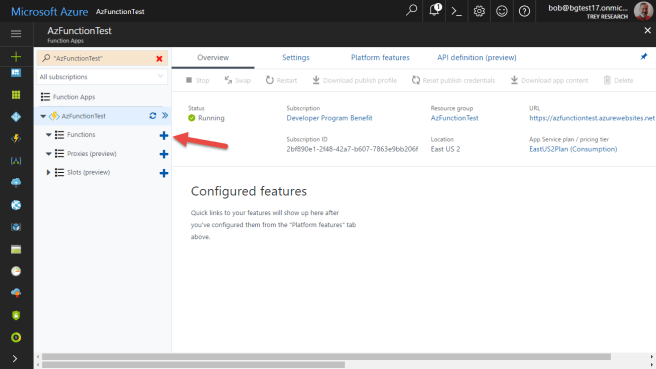
On the next screen, click Create to create your Function App. Give your function app a name, and associate it with a resource group. You also need to choose a hosting plan. The Consumption Plan is usually the best choice; it will dynamically start and scale your function on demand, and you pay for the computing resources only when it’s running. The App Service Plan runs your Azure Functions on dedicated VM’s in Azure, which is useful if they’re going to run continuously, or in other scenarios (detailed here).
You should now see your Function App in the Azure console.
NOTE: There are two kinds of Azure function apps, those using the v1 runtime and those using v2. The v1 runtime is .NET Classic, and the v2 runtime is .NET Core. Since we’re using CSOM, which is .NET Classic, you need to set the function app to use v1. When this article was written, v1 was the default; now v2 is the default! So before you add any functions, go to the Function App settings and set the Runtime version to v1. Once you start creating functions, you can’t change it back, so now is the moment! Many thanks to my friend Rob Windsor for pointing this out!

Now in the left, click the + sign next to “Functions” to create your first Azure function.
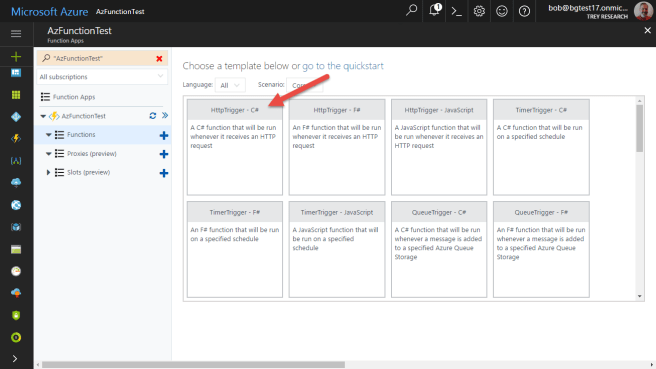
You’ll be presented with some pre-made functions that you can start with; instead, scroll down a bit and create a custom function.

For this example, select HttpTrigger – C#.
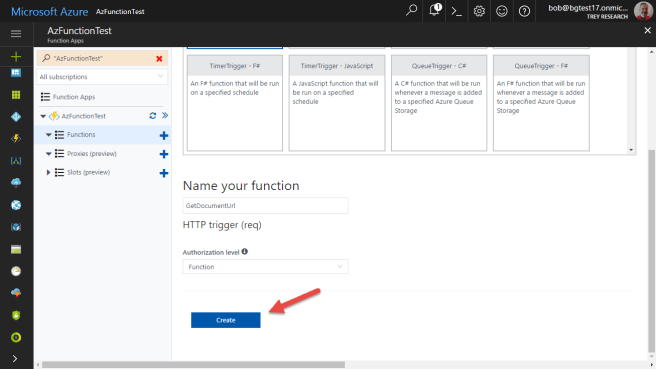
Now scroll down and fill in a name for your function. Set the Authorization level to “Function”. This is the authorization to call our function, not to call into SharePoint using CSOM. Click Create to create your function.
Eventually (in Part 3 of this blog series), this function will return the “WOPI URL” for a SharePoint document – that is, the URL that launches Office Online Services to view the document in the browser. Most of the time we’re given the document’s location, suitable for downloading the document; translating that into a “WOPI URL” requires an API call. (If you’re curious about the “WOPI” thing, it’s the Web Application Open Platform protocol, by which one web application can open a document that’s stored in another web application on behalf of a user. In this case, of course, the web applications are Office Online Server and SharePoint. Surprisingly tricky!)
But this is just Part 1 of the series, so let’s keep it simple and just construct the regular document URL given its site URL and the document location within that site. Yes, that’s basically just concatenating two strings, but it’s good to start simple.
You’ll find yourself in a browser based IDE that’s kind of like a lightweight version of Visual Studio. Replace the initial function code with this:
using System.Net;

public static async Task
Run(HttpRequestMessage req, TraceWriter log)
{
    try {
        log.Info("Executing function");

        // Get query string and request body
        var queryPairs = req.GetQueryNameValuePairs();
        dynamic data = await req.Content.ReadAsAsync();

        string path = queryPairs?.FirstOrDefault(
            q => string.Compare(q.Key, "path", true) == 0
        ).Value;
        path = path ?? data?.path.ToString();

        string siteUrl = queryPairs?.FirstOrDefault(
            q => string.Compare(q.Key, "siteUrl", true) == 0
        ).Value;
        siteUrl = siteUrl ?? data?.siteUrl.ToString();

        Uri itemUri = new Uri (new Uri (siteUrl), path);

        return itemUri == null
            ? req.CreateResponse(HttpStatusCode.BadRequest,
"Please pass a path on the query string or request body"
+ req.RequestUri)
            : req.CreateResponse(HttpStatusCode.OK, itemUri.AbsoluteUri);
    }
    catch (Exception ex)
    {
        string message = ex.Message + "\n" + ex.StackTrace;
        return req.CreateResponse(HttpStatusCode.BadRequest, "ERROR: "
+ message);
    }
}
Because the Azure Function was set up to run on an HTTP trigger, it’s not surprising that it’s called with HTTP request message. A TraceWriter object is also passed in for your logging pleasure. Lines 10-21 are just obtaining the arguments, siteUrl and path, which could be either in the query string or in the request body. The big action is in line 23, which combines the two URL’s. The function then returns an HTTP response with the resulting URL or, if there was a problem, with an error.
To test your work, expand the panel on the right and enter values for siteUrl and path into the JSON, in the request body or as query string parameters.
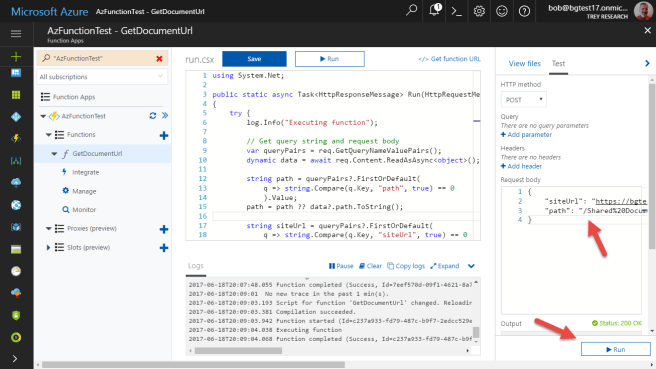
You should be able to run and get a successful result that combines the two URLs.
Advance to the next article to register an Azure AD application for this Function.
Part 1 – Setting up your Azure Function (this posting)
Part 2 – Registering your Azure Function with Azure Active Directory (next posting)
Part 3 – Calling CSOM with Application credentials from your Azure Function

The ; at the end of line three causes a compilation error.
LikeLike
Thanks Loz – fixed! My method of inserting code snippets was at fault; I’ve since switched to using Github gists but this article still used the older, error prone method. Good catch!
LikeLiked by 1 person
Hi to every one, the contents present at this web page are really remarkable for people experience,
well, keep up the nice work fellows.
LikeLike